Showing posts with label diy. Show all posts

Friday, December 12, 2014

Berries For Days!

Hey y'all! So today I figured I'd post a little Christmas-y DIY!  I made a couple of these a couple years ago as gifts for my mother-in-law and aunt!  This isn't going to be a step by step, so it's gonna be a pretty short one today!


I actually found something similar on Pinterest that made me want to make these.  It seemed simple enough!  But little word of warning, if you do it exactly like me, it's not simple at all. Ha!!
So I went to Hobby Lobby (because...I'm obsessed) and purchased a couple large "D"'s and then ran over to the floral department and bought as many clusters of red berries as I could find and a roll of burlap.

I ran home and got started.  I painted the D a brown color, took all the little plastic berries off, and started hot gluing them to the D.  One by one.  I have to tell you, there has to be a better method to getting all those plastic berries onto the letter, BUT as time consuming as it was, I LOVED the way it turned out!

If you are going to make this, and make it the way I did, be ready with LOTS and LOTS of hot glue sticks.

Once all the berries were on the letter, I had my husband make a bow for it.  He doesn't like it, but he's the bowmaker in our house! :)

They were time consuming, but turned out great! My mother-in-law keeps hers out pretty much year-round since it matches her house!

What are y'all's favorite Christmas gift DIY's?

See you soon!

XOXO.

Wednesday, December 3, 2014

Christmas Food

Sorry for my absence y'all, things have been a little hectic around our place since Thanksgiving!

It's officially December, which means Christmas/Holiday parties are starting up!  My in-laws always have a holiday party around the first of December, so I'm currently getting things together to cook and help out with that.  I thought today, since I am getting ready to spend A LOT of time in the kitchen for the next couple days, I'd do a couple of my favorites from past Christmas parties!


Sorry about the poor quality of the photo, this is from a couple years ago!  This was my first "crafty" food project!  I was hosting my friends for Christmas and decided to make a meal and so I needed a Christmas dessert!  I was worried they wouldn't turn out, but I have to say they were very easy to make!

I used a boxed mix for the cupcakes (I know, I know, this would've been better if it were homemade...) and made it according to the package.
I let them cool then used chocolate frosting (again, from the store) to ice the tops.
I put the Nilla Wafers on, trying not to put them directly in the middle.
I used white chocolate chips for the eyes, and just flipped them onto the flat side and pushed the "pointy" side into the frosting.
The antlers were a little harder, I had to make sure I found whole pieces of pretzels, and those things break so easily in the bags!
I bought a little tube of black gel icing to dot the eyes, then used chocolate frosting to "glue" on the m&m noses.

Simple enough right?   They were great for the party, however, there were only 4 of us so there was way too many! Ha!


Now, onto to my favorite dish from last year's Christmas party!


When I initially saw these snowmen cheese balls on Pinterest, I really had no interest in doing it.  The year before I'd made a cheese ball that hadn't gone over well, so I wasn't planning to repeat it.  All the recipes I'd found called for nuts in or on the cheese ball, and I was pretty sure that's what kept people from really enjoying the last one I'd made.  But, my husband reminded me (as he often does) that you don't necessarily HAVE to stick with a recipe.  So I used the recipe I'd used the year before, simply omitting the pecans on the outside of it!
Here is a link to the recipe I used, on Kraft's site.
To make the snowman, I just separated the mixture into two balls, one a little smaller than the other.  Once they were on the plate, I got Craisins (because I'm just not a fan of raisins) and made the eyes, mouth, and buttons, and used a baby carrot for the nose!
It was almost completely gone after the party ended, so obviously omitting the pecans was a good call!

Do y'all have any Christmas themed recipes you like to make for the holiday season?


Hopefully things have slowed down a little and I'll be back on here more often and have more posts for y'all!

See you soon!

XOXO.

Thursday, October 30, 2014

3...2...One Day!!!

Halloween is TOMORROW!  How excited are y'all!?  I'm still not finished with my costume...of course.  I probably won't be done until tomorrow....afternoon. Ha!

I figure I'll just do a few more quick costumes!  First up, my Hunter look.  This one got thrown together in a matter of 30 minutes.  I didn't really want to dress up this particular year, but my friends did, so I had to!  I had the boots (they are BOGS hunting boots, and I believe they are from the kids department), the shorts, the hat, and the shirt.  I grew up in the country so I own A LOT of camouflage.  I borrowed the orange tank, and my friends had the brilliant idea to make me a hunter who got mauled by a wild animal, so they cut up my shirt.  It ended up being some pretty serious cuts, I figure I should've bloodied up my body, because I don't believe I would've made it out alive!

I borrowed some camouflage and orange duct tape to add to the pockets of my shorts since you could see them.  And that was it! I was ready!

Just a couple bonus costumes from my sister & nephew!

Mason constantly wants to dress up for special days at school, so I thought I'd add a couple of the costumes I had to make for that.

First was Dr. Seuss day!  He wanted to be the Cat in the Hat.  Felt has become my best friend with his costumes, so red and white felt and a lot of cutting and sewing to make a hat.  Black jogging suit for his body, white gloves and some face makeup for whiskers.  His bow I sewed and stuffed with pillow stuffing.
Not sure why he looks miserable....he wasn't! Ha!


Next was fairytale day! He wanted to be Flynn Rider from Tangled.  Again, I always try to use things we already have.  So, brown jogging pants and a white t-shirt worked great! I bought a baby blue t-shirt and cut it up the middle to make the vest.  I bought three buttons that I thought looked close enough to the same so we could button it together and then drew on some facial hair.  The hardest part of this costume was the Wanted poster I drew so he could carry it around with him all day.  But he had a ball pretending to be him all day, he quoted his favorite Flynn Rider lines all day long! 


That's it!  That's all I've got for this year! :) Monday, of course, I'll do a recap of this Halloween, so stay tuned!

See you soon!

XOXO.

Thursday, October 23, 2014

Halloween Costumes Week 3!

8 DAYS!  I'm getting so excited!  I just ordered part of mine & Tina's costumes and it made me that much more excited! :)

Okay, so today I'm gonna do a couple homemade costumes that are perfect if you are waiting until the last minute (I know because my costume was absolutely thrown together a few hours before the party! HA!)

First, let's talk about my in-laws costume!  It's "Curiosity Killed the Cat"! So funny!


The reason why I included this costume isn't because it was last minute for them, but mostly because I think people will have almost everything they need ahead of time to make it!

Basically, for "Curiosity", all they did was take a black shirt and made a question mark with duct tape!  That simple! Of course, he also wore a little "My name is...Curiosity" name tag so that it would be clear!

Now, for the "cat", she wore all black and the mask, tie, and tail she got at Wal-Mart for like $5.  She put on some cat whiskers with makeup, and that's that! Simple as can be and very creative!  They also included some "murder weapons", a rope and a plastic knife, all of which you can also find at Wal-Mart!


Costume #2!  This was literally thrown together hours before a Halloween party, so if I can do it, I know y'all can!
I LOVE Disney. Love it.  No shame in my game, I went to Disney for my honeymoon and I'd go every year if I could afford it!  So when we decided to go to this Halloween party the day of the party, we knew we had to be something that was easy to make! So obviously, Mickey & Minnie!


My favorite thing about our outfits.....the comfort! Ha! :) It wasn't your typical Mickey & Minnie, but we made it work!  We ran to Wal-Mart and grabbed Mickey & Minnie ears, a plain black shirt, a plain red shirt, and red basketball shorts! Simple enough right?
For Minnie, Tina took the red shirt and cut the collar a little so it would fit real loose.  Her outfit is pretty simple, black leggings, black tank, red top.
For Mickey, I just put the outfit on.  I did not do ANYTHING to this!
For our noses, we just used pencil eyeliner.  And we wore chucks for the night! ;)
This was the easiest costume I've ever put together.  And maybe it wasn't close enough to the actual costumes, BUT this was last minute and I think that it worked perfectly!  It was a cheap and easy costume and can easily be recreated!


Last but definitely not least, is my nephew's costume.  Now those above were good last minute costumes....his is not!


It's almost Halloween and I'm not ashamed to admit that I'm almost as excited as my 7-year old!!  I think I enjoy dressing him up as much as I enjoyed doing it myself when I was younger (or now if I had a costume party to go to).

Last year was the first year that my son and I came up with his costume together.  Remember, I told you that he had gotten his first taste of being in a competition and he was now ready to win!  So, when it was time to come up with a costume, we had several choices to go through and lots of internet research (pictures mostly for him).  We finally settled on something creative and not expected!

Mr. Monopoly!

Mason Age 6
This wasn't a particularly hard costume to make.  He had black dress shoes and a white button-up shirt.  I went to Wal-Mart and got a long sleeve black t-shirt and some black jogging pants.  I cut the shirt down the front and sewed it back to look like a suit jacket and then cut a slit on the front left side to create a pocket.  Then I found some green foam sheets, which I took a sharpie and made it to look like money and sewed it into the pocket.  I bought the top hat at a costume shop and the stick he is carrying was actually a magician's wand, but I glued a silver painted "M" to the top so it would look like a walking stick.  I took some money from my Monopoly game and tucked it under the ribbon on the top hat, along with some of the property cards.


The last thing we did was make him a candy bag that looked like a money bag.  I found some white and green felt and sewed a bag and sewed on a money symbol.  Then I took some of the money foam I had made and sewed it around the top so it looked like it was busting out! The mustache was also purchased at the costume shop!


Now, everyone loved this costume and I kept hearing how creative and good he looked, but you know what?  He got third again! Well, at least he was still in the top!  We are going for a win again this year... We'll let you know! :)


That's it for this week!  We have one more post before Halloween, I hope everyone is as excited as we are! :)

See you soon!

XOXO.

Thursday, October 16, 2014

Halloween Costumes...Week 2!

15 days until Halloween!!! It's so exciting, I cannot wait to bust out my costume!  I may do a DIY of the costume before Halloween, or I may wait and recap the costume after Halloween.  I'll decide when the time is closer! Until then, we will continue our weekly costume DIY!

So, couples costumes are adorable.  I love when people decide to combine to make an awesome costume.  That could be why in the recent past, my best friend and I have done costumes together.  But today I wanted to show a REALLY original costume idea that my in-laws did! They always have the most original costumes! I love seeing what they are going to do next. 


As y'all probably remember, there was a big scandal with Anthony Weiner sending out pictures of his "hot dog" out to women under the alias "Carlos Danger". Awkward!  My in-laws took the opportunity to turn the situation into a joke and decided that their costume would center on the controversy.


My mother-in-law decided she was going to be an iPhone. The first thing she had to do was figure out how she was going to make it work.  One of my favorite things about this costume is that it had a "text message" page. HA!  To make the text page, she took poster board and typed out a fake conversation, printed it and glued it on.  Complete with a photo! 


For the iPhone portion of the costume, she bought foam board, as it was sturdier than plain poster board.  To get an authentic look to her iPhone, she printed out apps as well as the Apple icon, the camera, etc. that you would find on an iPhone.  Of course, to make the point of the costume a little more obvious, she attached a few Anthony Weiner stickers.


Once all the icons were on the foam board, it had to be put together!  She cut slits at the top of the front and back of the "phone" and used elastic straps so that she could wear it throughout the night.  After she had attached the "text" page to the costume, she put a binder clip on the side to keep it closed.  It also made it easier when she wanted to "open" the text! Genius! For "Carlos Danger's" (aka Anthony Weiner) costume, they simply got a hot dog costume and he wore an Anthony Weiner button.


I mean seriously, talk about original! They have the best costumes! 

Now it's time for my sister to talk another of my nephew's homemade costumes!


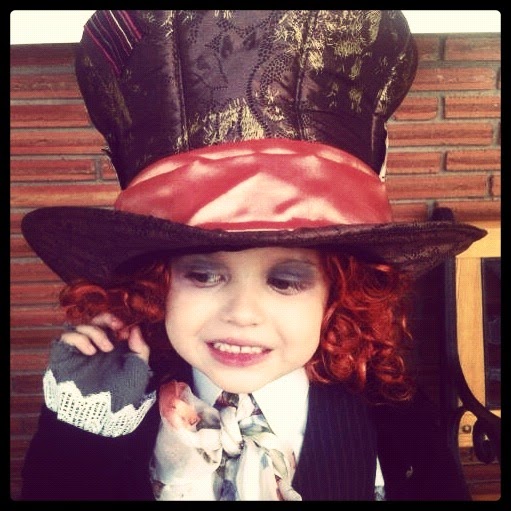
So, after two years of pirates and sword, my son decided he would like to try a different costume.  He decided he wanted to be the Mad Hatter (yes, you have discovered a pattern, Johnny Depp characters. Yes, my child may be a little obsessed with him.  No, I don't mind, I may encourage it. Just saying.).
He had just seen the movie and thought he was "so cool".  This actually wasn't too hard to do because when I started looking at pictures of Johnny Depp's Mad Hatter, it looked like we could basically throw together things from a bunch of different outfits and it would work.

So, find some bright colored socks and mismatch them.  Check.
We used the same dress pants from the pirate costume because they were already too short.  Perfect.
White button up shirt.  Check.
The vest from his pirate costume.  Check.
A scarf we borrowed from my grandmother with flower patterns and tied it in a bow.  Check.

Ok, the hardest part was the hair.  We found the actual replica hat at a local bookstore, so I didn't have to try and make that. But finding the wig was very hard!  Finally, after a last minute decision, I purchased a Merida wig (the princess from Brave) because it was red and curly and there was plenty of hair!  I stuffed most of the hair up into the hat, because it was a little too big on him and this helped keep it steady on his head.  I also didn't mind that hair poked out funny because that is the point of the Mad Hatter anyway!

I put a little white makeup all over his face, but most of what we did was color around his eyes with blue eye shadow.  And there you have it, he was done!

Mason: Age 5

Now this was the first year he got to compete at school in the costume contest.  He got third and he also got his first taste of whats it's like to win something.  And so it began! From that point on, he was determined to have the best costume and get first place. 


There y'all have it! Week 2 is in the books, we will have another week of homemade costumes next Thursday!

See you soon!

XOXO.

Tuesday, October 14, 2014

DIY-Day

The summer before my college senior year (well, senior semester), my best friend and I got an apartment.  This meant that I had to buy furniture.....and for a poor college student, that means find cheap stuff!  My dad actually built me a bed frame because I refused to buy a bed, I was fine with putting a mattress on the floor and living like that. Ha! I got a cheap desk and entertainment center from Wal-Mart that served it's purpose for that year. I gave my desk to a friend after I graduated and the entertainment center was used for a couple more years once I got married and we were too cheap to buy a nice new one.

Our old entertainment center
But, as things tend to do, it broke.  Well, it honestly had been breaking since the day I put it together, but I'd made it work! But when we moved into our apartment, my husband and I decided it was time to try to make our place look a little more age appropriate.  I looked for an entertainment center at every store I walked in to.  I had a very specific idea in my mind of what I wanted my TV to sit on and nothing I could find would work.  So I went to my favorite idea page, Pinterest.  I found a picture where someone had taken a dresser and transformed it into an entertainment center.  That was it!  I went home to visit my parents that next weekend and asked how attached they were to the dresser that was sitting my old bedroom.  They let me take it.  Time to start my first real DIY.

I never took a picture of what the dresser looked like before I'd already started working on it, but it was an off-white color, with some pretty terrible handles. 

So first things first, I took out the drawers and took the handles off.  Then, I sanded it all down. I also removed the slides on the top row because I wasn't putting them back in.  I decided on this turquoise color because I loooooove the color and knew I wanted to use it somewhere in our home.  And I thought it would be nice to have a pop of color in a room with mostly neutrals. 

Applying the first coat
I had to use a couple coats of the blue color because despite sanding it, it was almost like it didn't want to hold the color.

Our apartment was a danger zone for a while
Once I'd painted the dresser, we ran to Lowe's to find new handles.  We opted for these awesome ones that were like a rusty silver color.  We got a few knobs and six handles for the drawers that we were keeping.  We also went over to the lumber department and picked up a durable piece of plywood and cut it to fit the top row to stabilize it so the cable box, DVD player, etc. would be secure.  We secured the plywood with a couple screws, though they were pretty secure without them.  As you can see in the above photo, Chris had also drilled holes into the back of the dresser for the various cords to go through.

I painted the fronts of the drawers, and actually decided to paint the inside of the drawers a dark brown, along with the plywood we'd put into the top shelf. After they'd dried, I attached the knobs and handles and put it back together. 

Finished!
It was such an easy project! And cheap!  I was lucky enough to already have the dresser, but I know that you can often find them at thrift stores, flea markets, etc.  We still use it, and it's easily the prettiest part of our apartment! :)

Hope y'all enjoyed!

See you soon.

XOXO.

Thursday, October 9, 2014

22 Days 'Til Halloween

Halloween is my second favorite holiday, Christmas has always been my absolute favorite, but Halloween is pretty great!

I love scary movies, and all scary things, so of course I love Halloween!  I love to see all the awesome costumes, whether they are homemade or bought from the nearest Wal-Mart or Target.  However, you jerks that choose to be clowns need to get to gettin' because I HATE clowns.

I thought that since there are still a few weeks until Halloween, I'd do one post every week dedicated to making a fun Halloween costume for yourself and I'm going to have my sister add a section on how to make some fun kids costumes!  Full disclaimer, they are "boy" costumes, but whatever if your little girl wants to be Capt. Jack Sparrow, then have at it! :)

Superheroes

Batman/Spiderman/Wonder Woman


When I was younger, my friend and I would constantly talk about our favorite superheroes (yes, we were nerds), hers was Spiderman, and she owned everything she could that had Spiderman on it.  I love Batman. We would argue ALL the time about who was better.  I still hold firm that Batman is better! 

Last year, my friends and I were planning to dress up for Halloween and head over to a party, but we weren't sure who we wanted to be!  I found this cute idea on Pinterest to be superheroes, and to make it girly, wear tutus!  The girls liked the idea so out we went to find shirts and tutus!  But who did we want to be?  I, of course, was going to be Batman.  I made that decision as soon as I saw the idea on Pinterest.  They were going deciding from Wonder Woman, Spiderman, and Superman. Out we went, to Spencer's, Wal-Mart, Party City, any place we thought may have superman shirts.  I found my Batman shirt at Spencer's, Cayla found her Spiderman shirt at Wal-Mart, and Tina's shirt was homemade.  We also picked up some socks at Spencer's.  Then we headed over to Hobby Lobby to find the items we needed to make our own tutus (we couldn't find adult sized tutus).  All we did was buy some elastic (I believe it was about $1.50-$2.00), measured each of our waists, and cut! :)  We also each bought different color tulle (Cayla got black and I got yellow- I believe they are around $4 and we each bought 2) and Tina bought a red t-shirt, a gold glitter foam sheet to draw out the Wonder Woman logo on.

We get back to my apartment and turn our floor into a hot mess of arts and crafts!  I love when everyone comes over and crafts, but the aftermath is never pretty!  After we'd cut the elastic to the size we needed, Cayla and I started working on our tutus, while Tina (who already had a tutu from a previous costume) started working on her shirt.  We cut the tulle in strips (I believe they were 36 inch strips, they may have been shorter), after that we just folded it in half, making sure the bend in the tulle was under the waistband, then pulled the ends down over the waistband and through the loop. The knot doesn't need to be too tight, if it is it'll curl.  We repeated the process until we were satisfied with the fullness of the skirts!  Now, we obviously didn't know how to do this before, and were not thinking about taking pictures of each step, so I thought I would post a link to one of the sites I used when trying to figure out how to make a tutu! Feels Like Home has a great tutorial on how to make a tutu.  She was making it for her child, but it's easily used for adults!

While we were busy doing that, Tina took her plain red shirt, laid it flat on the ground, and took her gold foam sheet and a sharpie pen and drew out the Wonder Woman logo.  When she finished, she just cut it out and glued it to the shirt.  As simple as that! We finished up, got all dressed up and were out the door!


Full disclaimer, we wore shorts under those.....because they were much needed! Cayla is also wearing red tights because we didn't have Spiderman socks! Also, I chose to make a yellow tutu instead of a black one because my shirt and socks were black and I wanted something bright!

There ya have it! An easy, cheaper alternative to the slutty superhero costumes! :)


I even got my husband to "dress up"!  Score!  He hates Halloween, he thinks dressing up is silly, and I can never get him to wear a costume.  Sooo, I wasn't sure how to make him do it, but I suggested he dress as Alfred, because he had a tuxedo tee that I thought would look perfect! Once he realized he really only had to wear black pants, a t-shirt, and a coat, he agreed!


Now, onto my nephew's favorite Halloween costume and my sister's DIY! 


Fall is my favorite time of year! Not only because I get to break out the comfy sweaters and boots, but also because when fall comes, so does Halloween!
I honestly cannot tell you why I love Halloween so much.  Maybe it's the candy, the haunted houses, or the mass amount of ghost shows that appear on television, but I think its mostly because I get to show my creative side with my son's costume.

Now, my son has never really been a easy costume type of kid.  He was three when he decided he needed to be something that I had to try and create.  (And let me tell you he was a very specific 3 year old, maybe he got that from me, I'm thinking his Aunt) So since that was the first costume I had to creatively put together,(and the second, because he carried this costume over to the next year.  Did I mention he looooooved this character?) I will start out the homemade Halloween costumes with it!

Introducing Captain Jack Sparrow

Mason: age 3
For this costume, I had to buy a hat and a wig but luckily we found those pretty easy.  Most Halloween stores had some type of pirate wig and hat.  Keep in mind, it had been several years since a Pirates of the Caribbean movie had been out.  I pulled a picture of Captain Jack from the movie and used it as a reference when I was trying to put his outfit together.  His vest and pants were part of a suit that he had outgrown, but for this, the shorter legs were perfect.  The white undershirt was actually one of mine that I pinned together in the back and hid under the “jacket” (which is an XS lightweight miliatry jacket, that I found in the clearance section of TJ Maxx.)  The scarf tie was also a clearance item from Walmart.  (We got lucky on all the clearance)  His rings were actually little girl rings that came in a party favor set.  I painted them black and didn't mind if it chipped.  That added to the piratey look! His boots are mine but he enjoyed playing in them so much that I couldn’t tell him no.  Finally, his candy sack.  It's just a black gift bag that cost $1 and I printed and cut out the pirate flag and glued it to the front.  I drew his facial hair on with an eyeliner pencil and cut some hair from the wig and braided it to make his little hairs hanging from his chin.  

He was definitely a hit!!! Everyone loved his little costume and he loved it so much he played pirate in it for months.  And when Halloween came around the next  year, guess what he wanted to be?

Mason: age 4
Captain Jack Sparrow (round 2)

For the second year, the fourth movie had been released.  And now the costume was available.  So we had something a little closer to the original to work with.  But my son had to look as close as possible!  So we took one of my belts and added it to make a sword holder.  Used the same jacket, boots and rings from the year before.  We had to add some new facial markings, because, believe me, he noticed them in the movie.  And this year, we made a pirate sack from a burlap bag for his candy.  


It's important for you to know, that kid loves pirates more than anyone.  And if anyone didn't think that his costume was spot on..... here is something for ya!


Ha ha! I loved that costume.


Well that was Week 1 of Halloween costumes!!! Come back, same time next week, for Week 2!  If we are lucky, I'll have an very interesting (and VERY original) couples costume! ;)

See you soon!

XOXO.

Tuesday, September 30, 2014

30 Days Hath September.....

April, June and November...

Hey y'all!

The last day of September I always tend to repeat that poem I learned in school. :) I thought I'd do a little DIY today, and since I was feeling nostalgic about my time in school, I thought I'd show a classroom!

My best friend is a kindergarten teacher.  She wanted to do a Dr. Seuss theme for her classroom, so I immediately started looking around for ideas to help her with the room.  Target served as a big help for the project, the $1 section had SO many Dr. Seuss items and she bought one of everything they had! Ha!  I think the finished product was fantastic, and it's a room that she can easily keep adding to!


I purchased a blank canvas and it had been sitting in my "craft box" for about a year.  I found a picture of a painted (or printed, who knows) canvas on Pinterest and thought I would never be able to make it look great, but I wanted to try!  So I got it out and freehanded the hat and the blue area.  I am really proud of the way it turned out! And it looked great hanging up outside of her classroom!


She wanted to have a big Thing 1 and Thing 2 to hang up and put her face on, along with her assistant's.  I wasn't sure how to even start this, so she got me some red butcher paper and I looked at a photo of them and drew it as big as I could.  I cut it out but didn't have a face, hair, or belly.  So for the hair, I used big sheets of blue construction paper, and for the white I used white construction paper.  It was long and tedious but I LOVE these two!  She laminated them to keep them safe! She ended up hanging it up just like this, along with the a place to hang up the artwork of the students.


Her classroom looks incredible!  I love Dr. Seuss, so this was such a treat to help her with!


I apologize for the Jack Daniels bottle in the background, I was using it for another craft project (See my Weekend Catch-Up post).
She inherited a classroom from a teacher who retired, so there was quite a bit of stuff for her to go through and decide to throw/give away or keep.  I didn't take a before picture of this thing, but basically it's a storage container that had clear plastic covers over the little storage bins.  She wanted to keep this because it was useful, but we had to do something to spice it up, it was dull and the clear covers were yellowed from age.  We went to Hobby Lobby and got a couple pieces of scrapbook paper and used some Mod Podge to "glue" it on.  She also put some polka dot ribbon on it, to contrast the polka dots I had planned to add on the sides.  I really wanted to add something to the sides so they weren't so plain, and figured if I found some Dr. Seuss font, I could paint them onto it.  After a few coats, I covered the letters in Mod Podge to help keep the paint from coming off.


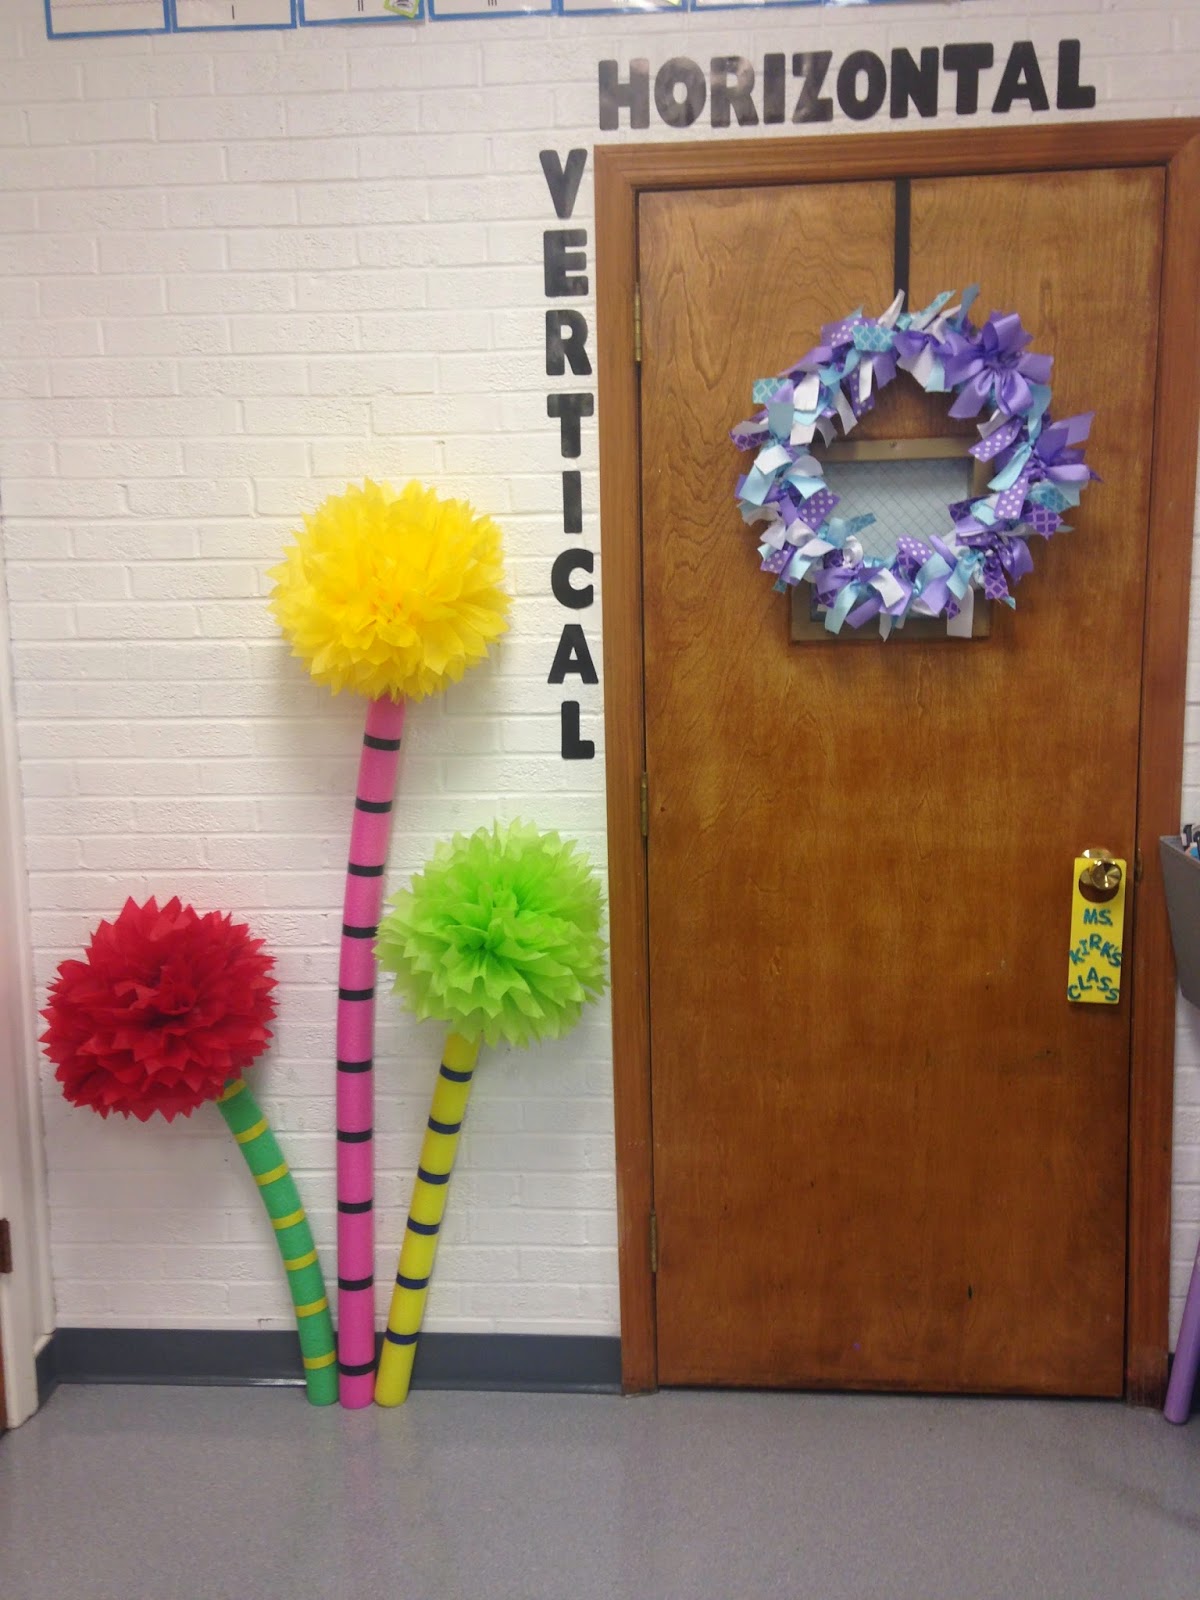
The truffula trees turned out SO great! My husband begrudgingly helped out with this activity.  He used electrical tape for the stripes on the trees, stuck the tops to them, and attached them to the wall.  The "trees" are just pool noodles, the tops are tissue paper pom-poms, and we hung them up with fishing line and used a couple Command hooks.


I made this for kindergarten registration/the first day of school.  She wanted them to take a picture holding a 'K', so I went to Hobby Lobby and bought a K and some Dr. Seuss fabric! I just used a hot glue gun to attach the fabric to the wood.  It isn't my best work, but I loved that fabric!

That's all the homemade items we made, but here is the bulletin board we made for the board right outside her classroom.  I wish I had gotten more photos of her classroom, but I did not, hopefully next year I will do better! :)


One last thing, I did not make this this year, I actually made it a couple years ago for Christmas, but she still uses it so it feels relevant! :)

I took an old picture frame that I had and took out the glass.  The background is just a piece of scrapbook paper I bought at Hobby Lobby and hot glued to the backing.  Then I laid out the K and cut the crayons that needed cutting and started gluing them to the paper.  I finished it off with a polka dot bow on top!  It was so simple to make and looks so cute in the classroom! 

I hope you guys enjoyed!  Let me know if you like seeing DIY's, if so I can try to do more!

See you soon!

XOXO.
Tuesday, September 23, 2014

Weekend Catch-Up

Here I am again!  3 days in a row....I could get used to this! :)  

So because I don't have any new clothing or makeup reviews (if you'd like to comment on things you'd like reviewed I would GLADLY test things out for ya!), I decided to do a little flashback to this weekend's wedding festivities and the shower I helped set up for the bride last month.

Not using this site for the last 6 months means that a lot of the things I did were not talked about!  I'm going to try to catch up as best I can, so just deal with it! Ha ha! ;)  I hope it won't be too boring!!


Bridal Shower

When my husband and I were married almost 3 years ago (Woah!), his godmother gave us a wedding shower.  So when his cousin got engaged, his mother informed me she would be giving his bride-to-be a shower and of course, I volunteered to help! :)
The happy couple are so sweet!  They are outdoorsy so we wanted it to have a rustic feel!  I definitely think we succeeded.  It was beautiful!  We didn't play many games, "Who has the groom?".  We just passed out envelopes with pictures in them, and whoever had the picture of the groom won a little gift.  The other was a mason jar full of Hershey's Kisses and we had the guests guess how many were in the jar.  A couple easy games that didn't take a lot of time before we got to the presents! :)

Homemade Sugar Scrub Party Favors!


Hubby's Aunt made the silhouettes! Beautiful!


The wine bottle I painted a couple years ago 

Cupcake dress :)
Myself & the bride-to-be!

I am thankful that my mother-in-law asked for my help, I love decorating for parties, and cooking and all that jazz.  Such a good time!  It was a successful little get together and I believe the bride loved her gifts!

The Wedding!

The happy couple exchanged vows & their first kiss this past weekend.  It was a beautiful ceremony in a GORGEOUS church! 

The First Kiss! 

It was such a fun night with family and friends!  I love weddings because you get to spend such a happy event with the people that you love the most!  I hope the night was so memorable for these two and that their lives together are filled with nothing but happiness! :)


Also, my dress for the wedding was from ShopSosie.com.  I am loving that site! It's a shift dress, which I love!  It is a perfect dress for fall.  It's the Middleway Shift Dress in the color Olive.  The original cost of the dress was $45, but because I purchased it during a sale, I got $5 off.  
I was a little worried about it being too short, but being 5'2 does have some advantages, and though it may look a little short in the picture, it actually was a great length!  I did have a little issue with getting the wrinkles out of the dress, but after I hand washed it and hung it outside to dry, they came right out!!  I'd definitely check the site out, they have some amazing deals and their clothes are adorable! 

See you soon!

XOXO.